


Have you ever discovered unwanted blank pages in a Word document? This can happen not only to beginners but also to experienced users. The causes could be minor formatting errors or simple oversight. How to remove pages from Word? Our article provides the answers. Let’s tidy up your document together.
Recommend that you also read: How to Delete a Google Account – Detailed Guide
Why Extra Pages Appear
Before figuring out how to delete pages in Word, it’s essential to understand where they come from. Common causes include:
- Hidden characters in the text.
- Table breaks in the text.
- Excessive line breaks and spaces.
Most of these elements are hidden in normal view, so users don’t notice them while working on the document. When an extra page appears at the end of the document, after a table, or somewhere in the middle, it can be quite a surprise. But we’ll show you how to remove pages from Word, no matter what caused them to appear.
Method 1: The Simplest Way How to Remove Pages from Word
The first thing to try is the basic delete key. If you find an unwanted page:
- Click on the page with the left mouse button.
- Press “Backspace” (←) or “Delete” (Del) until all unnecessary elements are removed.
This method helps remove invisible paragraphs made up of empty lines, often created by pressing the “Enter” key multiple times. However, it doesn’t always work, so we’ll explore other methods.
Method 2: How to Remove Pages from Word
Your blank page might not be so empty after all. It could contain non-printing characters, like new paragraph markers that are invisible to the user. To check for these characters, you need to enable their display. Here’s how:
- Press “Ctrl” + “Shift” + “8” simultaneously.
- In Word 2019, 2016, 2013, 2010, and 2007, go to the “Home” menu, in the “Paragraph” group, click on the “¶” symbol (Show/Hide).
All formatting marks, including paragraph symbols “¶”, will become visible. You can now select them with your mouse and delete them with a single click of “Delete”.
Method 3: How to Remove Pages from Word
Another formatting element that might cause this issue is a “Page Break”. It helps format the end of sections but can lead to extra pages in the document. To remove it:
- Make non-printing characters visible using the methods described above.
- Find the “Page Break” element, select it with your mouse, and delete it.
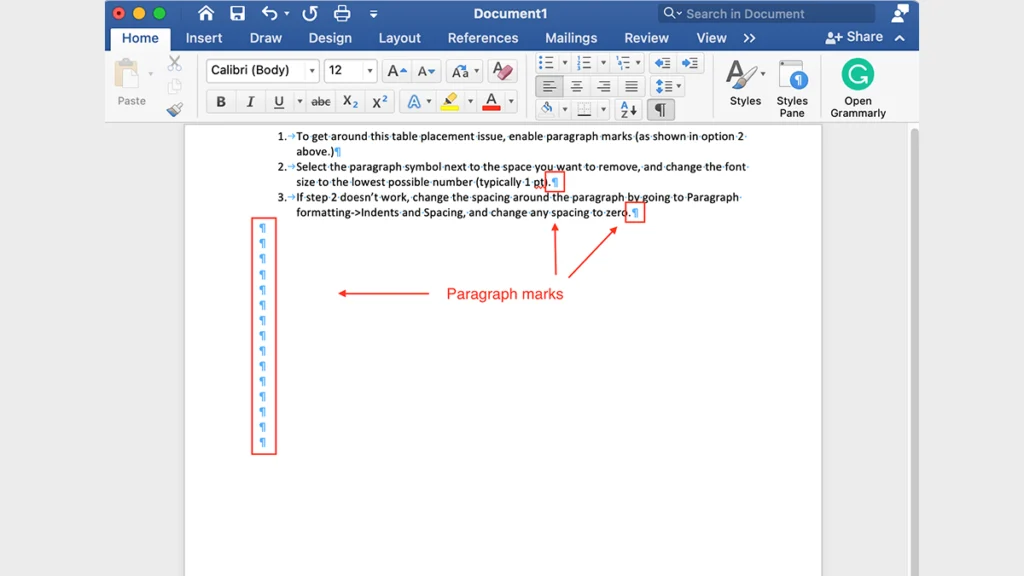
Method 4: How to Remove Pages from Word at the End of a Document
If the previous methods didn’t work and the extra page is at the end of the document, it might be caused by a table placed there. Is there a table? By default, Word always adds a blank paragraph after a table. If the table is at the bottom of the page, this paragraph moves to the next page. Since the paragraph is blank, it isn’t noticeable, but it creates a blank page.
Here’s the solution:
- Enable the display of non-printing characters.
- On the blank page following the table, find the “¶” symbol and select it with your mouse.
- In the “Home” menu, under the “Font” group, reduce the font size for the selected symbol to the smallest size.
The tiny symbol will fit on the previous page, making the extra page disappear.
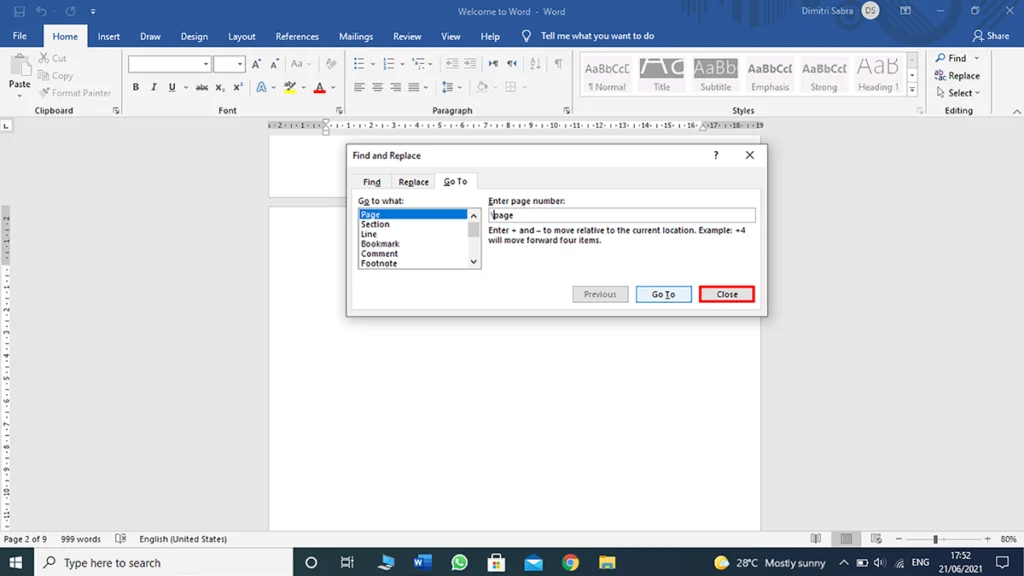
Method 5: How to Remove Pages from Word Inside the Document
Sometimes a blank page appears in the middle of a Word document. This might happen during editing. You can enable the display of all symbols and delete the unnecessary ones.
Another simple method:
- The current page will be highlighted. Press the “Delete” key.
- Press the key combination “Ctrl” + “G”.
- In the “Find and Replace” window that opens, go to the “Go To” tab, and in the “Enter page number” field, type: “\page”.
- Click “Go To” or press “Enter”.
Method 6: How to Remove Pages from Word by Exporting to PDF
This method is surprising but effective. It’s useful if you don’t need to edit anything and just want to print the final document without the blank pages. Here’s the step-by-step guide:
- Note the numbers of the blank pages.
- Open the “File” menu.
- Click “Create PDF/XPS Document” and then “Create PDF/XPS” or “Save As”, then “PDF or XPS”, then “Options”.
- In the window that opens, specify the range of pages with text, excluding the blank ones, and click OK.
You’ll get a new document in PDF format without the extra pages.
How to Remove Pages from Word – Video
Frequently find extra pages appearing “out of nowhere” in a finished document? To learn how to delete pages in Word, watch this video:
Conclusion
Here are several effective methods how to remove pages from Word. Each of them will help you get rid of unnecessary pages in your document. Choose the most convenient one and use it whenever you encounter extra pages.
Frequently Asked Questions How to Remove Pages from Word
Use the find and replace function to remove excess page breaks and other non-printing symbols. Press “Ctrl” + “H” to open it.
Use the outline or navigation view mode to find and delete unnecessary elements.
Save the document, restart Word, and try again.
Move the cursor before the table and press Backspace to delete the extra paragraph or page break.


